Software Use and Sign Programming Questions
Question: What version of the SignX software do I need for my EMC sign?
Answer:
The Signtronix website will have the latest version of your SignX sign programming software.
- Visit the Signtronix website at www.Signtronix.com
- Click on the “Customer Support” link on the left
- Click on “Sign Software” and the software page will open
Now search for your software based on the date your sign was purchased.
If you own an EMC purchased prior to July 2010 and have the Radio Frequency type of communication, then you must use SignX version 1.12.
Question: How do I place graphics on my sign?
Answer:
Within the main programming window of your SignX software click on “bunny” icon to access your graphics
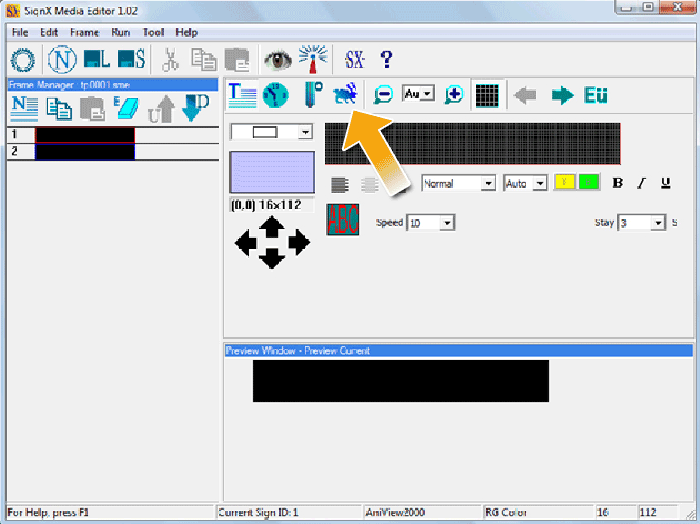
Note: Sometimes the window that pops up doesn’t go directly to your graphics folder. If this occurs, you must do a search of the folder that contains the graphics. To do so, follow these steps:
- Click on the bunny icon and the “Open” window will appear
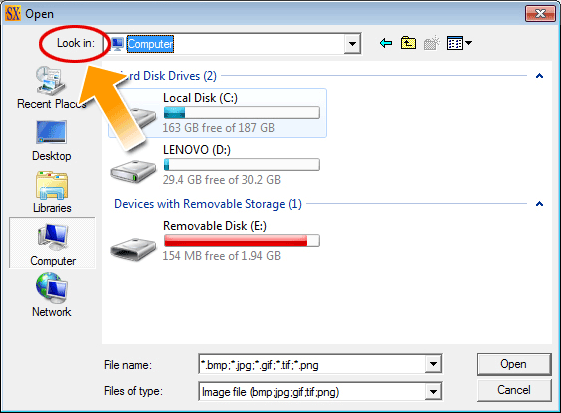
- Where it says “look in” click on the down arrow and select “(My)Computer”
- Double click on “Local Disk (C:)” Under “Name” double click on the “Program Files” folder
- Double click on the “SignX Media Editor” folder and double click on the “SignX Graphics” folder
- You will then see all the graphic folders with the different graphics that are available for you to use
Question: How do I schedule a message or several messages to run at a later date?
Create all of your messages first in the SignX Media Editor software and then…
- Click on “Edit” on the top left hand corner of the SignX software and then click on “Edit Schedule”
- The “Edit Schedule” window will appear and you will see all of your frames under “Frame”
- Example: If you have a total of 4 messages/frames you will see a total of 4 frames under “Frame”
- Click on “Frame 1” and it will highlight it in blue and then deselect the days of the week that you do NOT want that first message/frame to display
- On “Begin Time” you will insert the time you want the first message/frame to start displaying on your sign. NOTE: The time is shown in military time
- On “End Time” you will insert the time you want the first message/frame to stop displaying on your sign
- You will have to follow the same steps for all of you message/frames.
Question: How do I make a message scroll?
Answer:
- After you type a long message within a message frame where you want the scrolling message click on the icon that has a red “ABC”
![]()
- Select “Group1” and then click on the image of the red “ABC” that is scrolling from right to left on the bottom right hand corner of the “Effect Type” window.
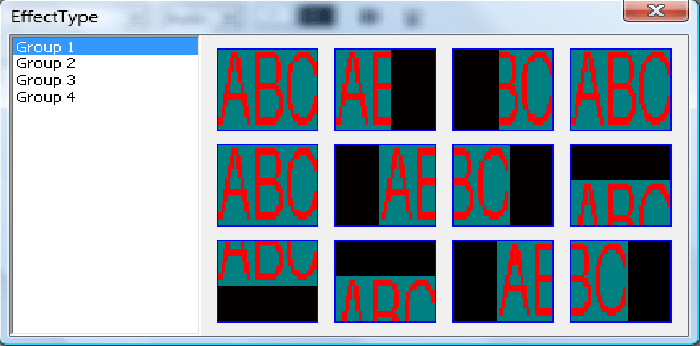
- NOTE: Each group has a different set of effects. Click on each Group to see the effects within that group.
Question: How do I save the message I just created?
Answer:
- In the SignX software click on “File” and then click on “Save As”
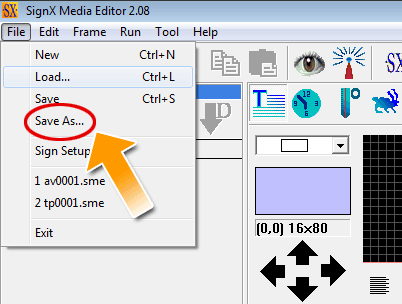
- The “Save As” window will appear and where it says “Save In” that will be the folder where you will be saving your messages
- On “File name” type in the name of the file that you are trying to save
- Once you have typed the name of the file click on the “Save” button on the “Save As” window
- Your file has been saved
Question: How do I load a message I created previously?
Answer:
- In the top menu of the SignX software click on “File” then click on “Load”
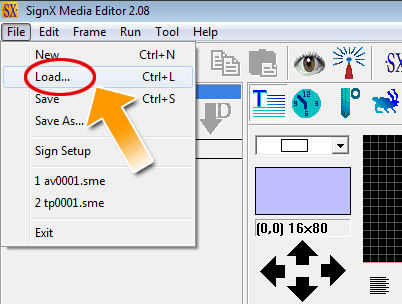
- Browse for the name of the file you want to open and then select it
- Click on the “Open” button on the “Load Document” window
- Your message will appear on the main programming screen within SignX
Question: How do I create multiple messages or graphics or animations in the message I want displayed on the sign?
Answer:
TO SEE THIS ANSWER IN A VIDEO TUTORIL,, visit: http://www.signtronix.com/video-files/software-tutorial/frame-manager.html
In order to have different messages show on your sign you must create “Frames” for each “thought” or graphic or animation you want displayed on your sign. Each frame may contain a single word or an entire sentence if you want to scroll the words.
Here is how you add multiple frames to your message file:
- Within SignX main programming window click on the icon that shows the letter “N” with lines to the side and below the N
![]()
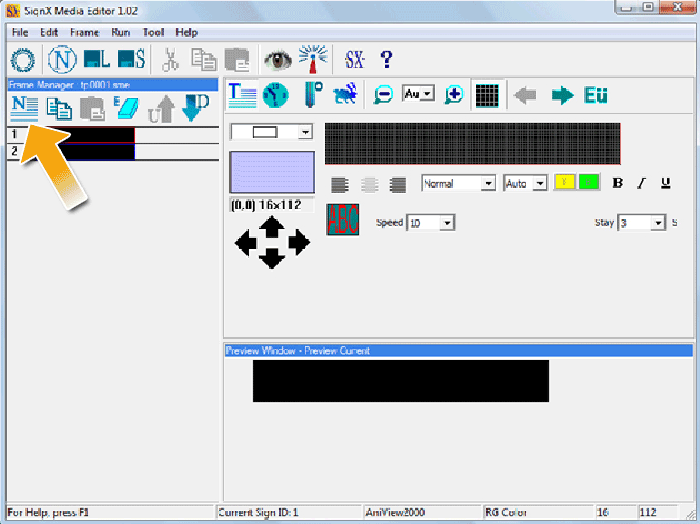
- Or you can also click on “Frame” and then click on “New Frame”
- Once you have done eight one of the above options you will see a new Frame with the word WELCOME on the left hand side of the SignX software
Question: Why isn't the temperature showing correctly in the SignX software?
Answer:
- This number in your SignX software screen is just the representation of the temperature and does not have any bearing on the actual ambient temperature where the sign is located. The sign has a temperature sensor on it and will read the accurate temperature. The software will never show the correct temperature because it isn’t designed to do so.
![]()
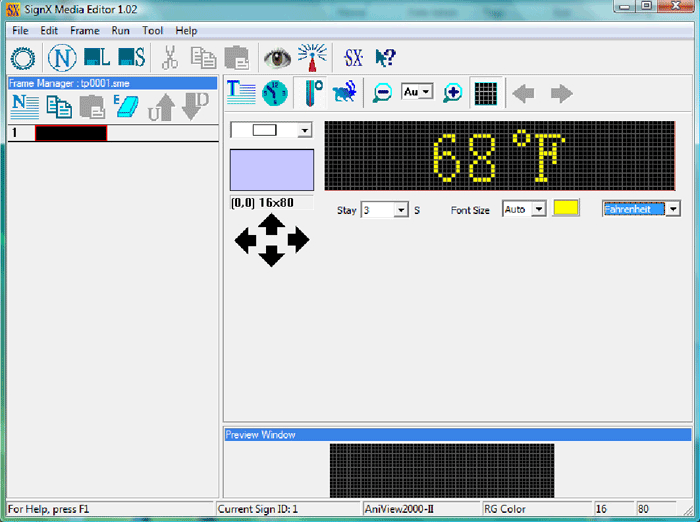
- If you wish to learn how to adjust the temperature reading on your EMC temperature sensor please see the FAQ “How do I adjust the temperature on my EMC?”
Question: How do I create new graphics or get additional graphics for my sign?
Answer:
- The SignX software does not create new graphics. If you wish to create new graphics you must use another 3rd party software that enables the creation of graphics or images.
- There are also many different software titles and web services that allow you to purchase pre-made graphics that are appropriate for your business.
- Note: Just remember that when you want to place a new graphic or animation on your sign that it must fit within the matrix (or aspect ratio) of your sign. Example: if you have a 32×144 matrix sign, then the graphic should have close to a 32×144 pixel configuration—or similar aspect ratio—so you can have as much of the image showing as possible.
Question: How do I use my own graphics?
Answer:
Within your SignX software click on the “bunny” icon to access your graphics
![]()
Note: Sometimes the window that pops up doesn’t go directly to your graphics folder. If this occurs, you must do a search of the folder that contains the additional graphics you want to use.
To do so, follow these steps:
- Click on the “bunny” or graphic icon and the “Open” window will appear
- Where it says “Look In” click on the down arrow and select “(My)Computer”
- Now browse to the folder in which the graphic you want to place on the sign is located
The TYPE of graphic files you can use on your sign depends on the type of sign you own.
If you have an RGB (full color) sign then you typically can use more complex or colorful graphics. It also depends on the matrix of your sign and the size / aspect ratio / pixel matrix of the graphic you want to place on your sign.
Question: How do I adjust the temperature reading on my EMC?
Answer:
How to adjust the temperature using the SignX Media Editor software:
- If the temperature on the sign is a few degrees off you can adjust the temperature on the SignX Media Editor software
- * Make sure you are connected to the Signtronix router or if you have the gold RF modem make sure it is connected to the computer *
- Open the SignX Media Editor software
- Click on “Run” and click on “Date Time & Temperature”
- The “Date Time & Temperature” window appears
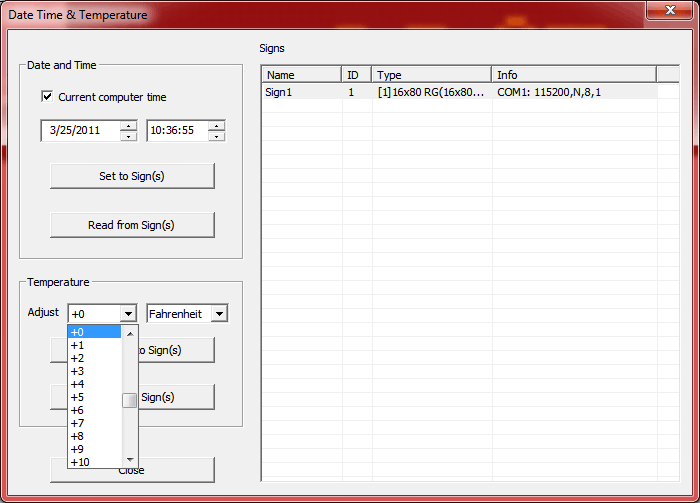
- Under the Temperature section click on the “Adjust” down arrow to adjust the temperature +/- degrees to the accurate temperature then click on the “Set Adjust to Sign”
- Now the sign should display the new temperature
Question: How do I dim my EMC?
Answer: How to dim the sign on the LedTool Software using Saturn communication:
Double click on the LedTool folder
Double click on the icon that has the hammer: “LedTool”
The LedTool window appears
- If you have a full color sign select the “C-Power5200” option
- If you have a Tri-Color sign (red, green, yellow) select the “C-Power3200” option
If you selected the “C-Power5200” or “C-Power3200” option click “Ok” button and a new window opens up
*Make sure that you are connect to the Signtronix Router, If not connect now*
Click on the top left hand corner on the option that says “Communication” when you put your mouse curser over it.
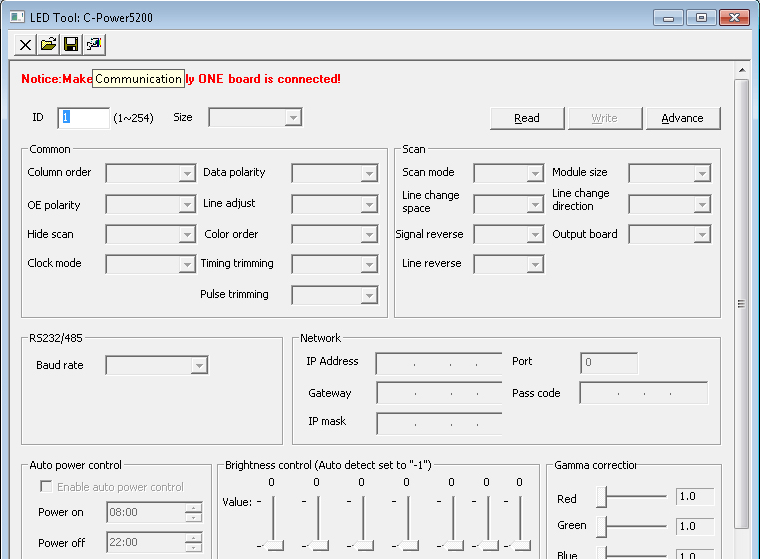
The “Communication” window appears – click on the “Network” tab
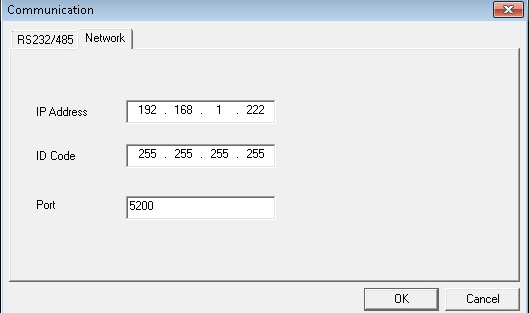
The IP Address should read 192.168.1.222 , ID Code is 255.255.255.255 and Port is 5200
(if not change it and then click “OK” button)
Click “Read” on the top right hand corner
You should get a window that says “Successful” and click “OK” on that window
NOTE: The brightness control (Auto detect set to -1) will be grayed out
Click on the “Advance” button and the “Enter Password” window appears
For Password type: 26888
Now the “Brightness control” option the bottom of the screen is no longer grayed out
You can now dim the sign by 4 hour increments. 0-4am, 4-8am etc…
Or you have the option to completely dim the sign for the entire day/night by using the bar for “All”
Once you have made the changes click on the “Write” button it might ask you for a password and type: 16888
Now you will need to turn the sign off (from breaker or the off/on switch on the back of the sign) in order for the sign to take the changes.
To dim the second sign:
- Click on the top left hand corner on the option that says “Communication” when you put your mouse curser over it.
- The IP Address should read 192.168.1.223 , ID Code is 255.255.255.255 and Port is 5200
- (if not change it and then click the “OK” button)
- NOTE: The only thing that changes is the last 3 digits in the IP Address
- Click “Read” on the top right hand corner
- You should get a window that says “Successful” and click “OK” on that window
- NOTE: The brightness control (Auto detect set to -1) will be grayed out
- Click on the “Advance” button and the “Enter Password” window appears
- For Password type: 26888
- Now the “Brightness control” option the bottom of the screen is no longer grayed out
- You can now dim the sign by 4 hour increments. 0-4am, 4-8am etc…
- Or you have the option to completely dim the sign for the entire day/night by using the bar for “All”
- Once you have made the changes click on the “Write” button it might ask you for a password and type: 16888
- Now you will need to turn the sign off (from breaker or the off/on switch on the back of the sign) in order for the sign to take the changes.
http://www.signtronix.com/wp-content/uploads/2016/05/guide_outfaq-Brightness-control.gif
Answer: How to dim the sign on the LedTool Software using Netgear Routers:
Double click on the LedTool folder
Double click on the icon that has the hammer “LedTool”
The LedTool window appears
- If you have a full color sign select the “C-Power5200” option
- If you have a Tri-Color sign (red, green, yellow) select the “C-Power3200” option
Once you selected the “C-Power5200” or “C-Power3200” option click “OK” button and a new window opens up
*Make sure that you are connect to the SigntronixA Router * (If not, connect now)
Click on the top left hand corner on the option that says “Communication” when you put your mouse curser over it.
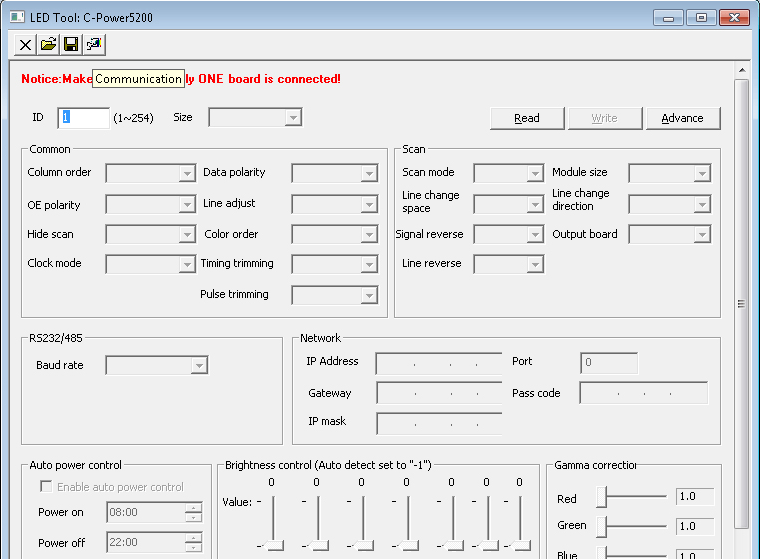
The “Communication” window appears and click on the “Network” tab
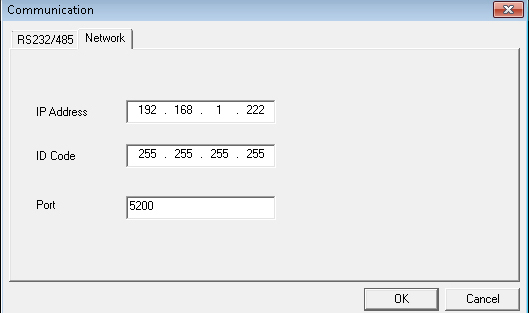
The IP Address should read 192.168.1.222 , ID Code is 255.255.255.255 and Port is 5200
(if not change it and then click “OK” button)
Click “Read” on the top right hand corner
You should get a window that says “Successful” and click “OK” on that window
NOTE: The brightness control (Auto detect set to -1) will be grayed out
http://www.signtronix.com/wp-content/uploads/2016/05/guide_outfaq-Brightness-control-1.gif
Click on the “Advance” button and the “Enter Password” window appears
For Password type: 26888
Now the “Brightness control” option the bottom of the screen is no longer grayed out
You can now dim the sign by 4 hour increments. 0-4am, 4-8am etc…
Or you have the option to completely dim the sign for the entire day/night by using the bar for “All”
Once you have made the changes click on the “Write” button it might ask you for a password and type: 16888
Now you will need to turn the sign off (from breaker or the off/on switch on the back of the sign) in order for the sign to take the changes.
To dim the second sign:
- Disconnect from SigntronixA router and connect to SigntronixB router
- On the LedTool window Click “Read” on the top right hand corner
- You should get a window that says “Successful” and click “Ok” on that window
- NOTE: The brightness control (Auto detect set to -1) will be grayed out
- Click on the “Advance” button and the “Enter Password” window appears
- For Password type: 26888
- Now the “Brightness control” option the bottom of the screen is no longer grayed out
- You can now dim the sign by 4 hour increments. 0-4am, 4-8am ect…
- Or you have the option to completely dim the sign for the entire day/night by using the bar for “All”
- Once you have made the changes click on the “Write” button it might ask you for a password and type: 16888
- Now you will need to turn the sign off/on (from breaker or the off/on switch on the back of the sign) in order for the sign to take the changes.
Answer: How to dim the sign on the LedTool Software using RF modem communication:
Double click on the LedTool folder
Double click on the icon which shows a hammer and is named “LedTool”

The LedTool window appears and select the “AntiView2000” option and click “OK”
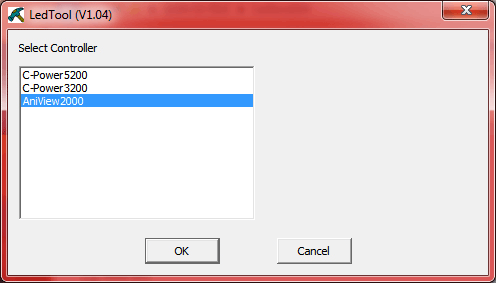
* Make sure that you have the gold RF modem connected to your computer and know what com port # you are using *
Click on the top left hand corner on the option that says “Communication” when you put your mouse curser over it.
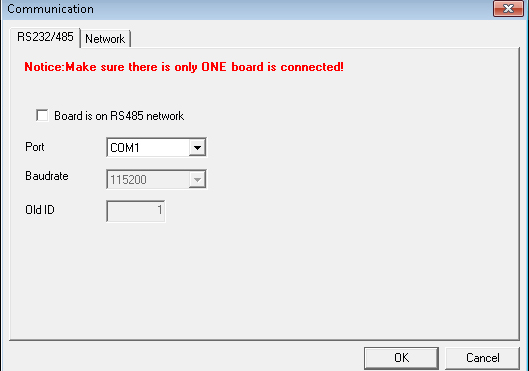
The “Communication” window appears
Select “Board is on RS485 network” ,”Port” Com # depends on your computer , “Baudrate” is 9600 and the “ID” is 1
Click “OK”
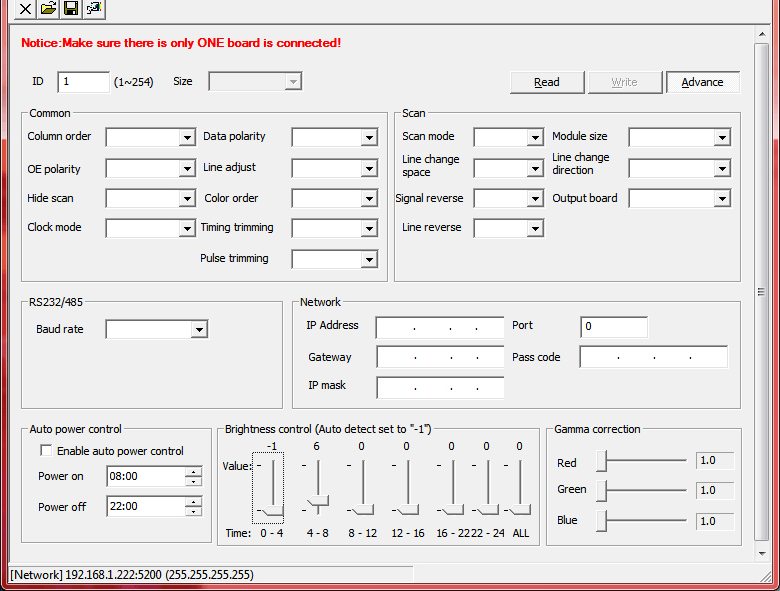
Click “Read” on the top right hand corner
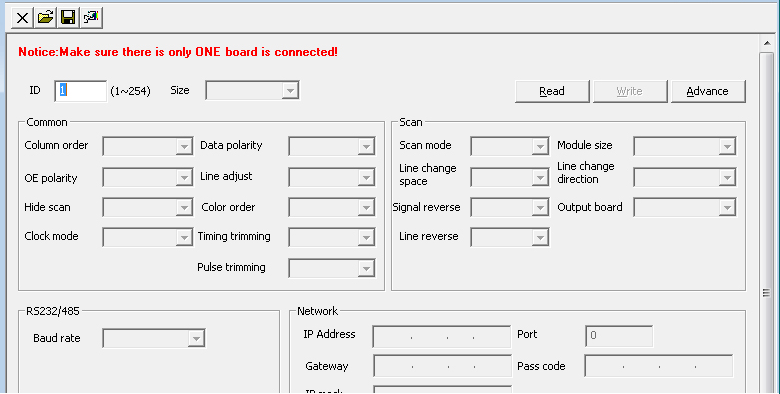
You should get a window that says “Successful” and click “OK” on that window
NOTE: The brightness control (Auto detect set to -1) will be grayed out
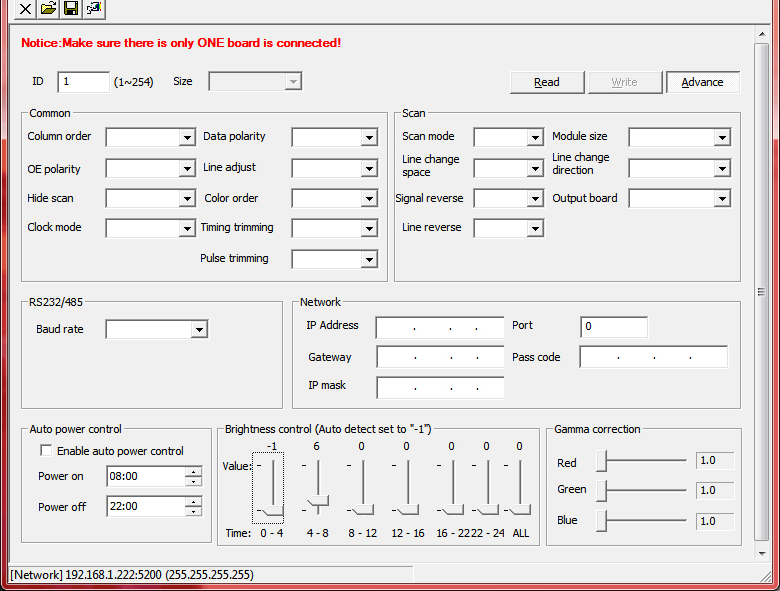
Click on the “Advance” button and the “Enter Password” window appears
For Password type: 26888
Now the “Brightness control” option the bottom of the screen is no longer grayed out
You can now dim the sign by 4 hour increments. 0-4am, 4-8am ect…
Or you have the option to completely dim the sign for the entire day/night by using the bar for “All”
Once you have made the changes click on the “Write” button it might ask you for a password and type: 16888
Now you will need to turn the sign off (from breaker or the off/on switch on the back of the sign) in order for the sign to take the changes.
To dim the second sign:
- Click on the top left hand corner on the option that says “Communication” when you put your mouse curser over it.
- The “Communication” window appears
- Select “Board is on RS485 network” , “Port” Com # depends on your computer , “Baudrate” is 9600 and the “ID” is 2
- Click “Ok”
- Click “Read” on the top right hand corner
- You should get a window that says “Successful” and click “Ok” on that window
- NOTE: The brightness control (Auto detect set to -1) will be grayed out
- Click on the “Advance” button and the “Enter Password” window appears
- For Password type: 26888
- Now the “Brightness control” option the bottom of the screen is no longer grayed out
- You can now dim the sign by 4 hour increments. 0-4am, 4-8am ect…
- Or you have the option to completely dim the sign for the entire day/night by using the bar for “All”
- Once you have made the changes click on the “Write” button it might ask you for a password and type: 16888
- Now you will need to turn the sign off (from breaker or the off/on switch on the back of the sign) in order for the sign to take the changes.
Question: How do I schedule my sign to turn on and/or off at specific times?
Answer: Signs with Saturn communication units:
Double click on the LedTool folder

Double click on the icon that has the hammer “LedTool”
The LedTool window appears:
- If you have a full color sign select the “C-Power5200” option
- If you have a Tri-Color sign (red, green, yellow) select the “C-Power3200” option
Once you selected the “C-Power5200” or “C-Power3200” option click the “OK” button and a new window opens up
*Make sure that you are connected to the Signtronix Router. If not connect now *
Click on the top left hand corner on the option that says “Communication” when you put your mouse curser over it.
The “Communication” window appears and click on the “Network” tab
- The IP Address should read 192.168.1.222
- ID Code is 255.255.255.255
- Port is 5200
If you do not see these settings – please change the fields so they match the above numbers
Click the “OK” button
Click “Read” on the top right hand corner
You should get a window that says “Successful”. When you do click “OK” within that window
NOTE: The Auto power Controller option will be grayed out
Click on the “Advance” button and the “Enter Password” window appears
Enter Password: 26888
Now the “Auto power control” option the bottom of the screen is no longer grayed out
Select “Enable Auto power Control”
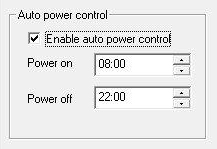
Program the time you want your sign to turn on under: “Power on”
Program the time you want your sign to turn off under: “Power off”
Once you have made the changes click on the “Write” button
Note: if asked for a password type: 16888
If you have a TWO SIDED EMC Sign:
To schedule your power on / power off times for the second sign:
Click on the top left hand corner on the option that says “Communication” when you put your mouse curser over it.
- The IP Address should read 192.168.1.223
- ID Code is 255.255.255.255
- Port is 5200
If you do not see these settings – please change the fields so they match the above numbers
Click the “OK” button
NOTE: The only thing that changes from the first sign settings is the last 3 digits in the IP Address
Click “Read” on the top right hand corner
You should now get a window that says “Successful”. Once you do click “OK” to close it.
NOTE: The Auto Power Controller option will be grayed out
Click on the “Advance” button and the “Enter Password” window appears
Enter the password: 26888
Now the “Auto power control” option the bottom of the screen is no longer grayed out. You can now enter your desired schedule for turning your sign on and off.

Program the time you want your sign to turn on under: “Power on”
Program the time you want your sign to turn off under: “Power off”
Once you have made the changes click on the “Write” button
Note: if asked for a password type: 16888
Answer: Signs with NetGear Router communication units:
Find and double click on the LedTool program folder
Double click on “LEDTool” program (the icon that has the hammer)
The LedTool window appears
- If you have a full color sign select the “C-Power5200” option
- If you have a Tri-Color sign (red, green, yellow) select the “C-Power3200” option
Once you have selected either “C-Power5200” or “C-Power3200” option click the “OK” button and a new window appears
Make sure that you are connected to the SigntronixA Router (wireless connection through your laptop’s network connection tool). If not, connect now.
Click on the top left hand corner on the option that says “Communication” when you put your mouse curser over it.
When the “Communication” window appears click on the “Network” tab
- The IP Address should read 192.168.1.222
- ID Code is 255.255.255.255
- Port is 5200
If you do not see these settings – please change the fields so they match the above numbers
Click the “OK” button
Click “Read” on the top right hand corner
You should now get a window that says “Successful”. Once you do click “OK” to close it.
NOTE: The Auto Power Controller option will be grayed out
Click on the “Advance” button and the “Enter Password” window will appear
Enter the password: 26888
Now the “Auto Power Control” option the bottom of the screen is no longer grayed out
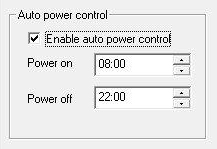
Program the time you want your sign to turn on under: “Power on”
Program the time you want your sign to turn off under: “Power off”
Once you have made the changes click on the “Write” button
Note: if asked for a password type: 16888
If you have a TWO SIDED EMC Sign:
To schedule your power on / power off times for the second sign:
Disconnect from SigntronixA router and connect to SigntronixB router
Within the LedTool window Click “Read” on the top right hand corner
You should get a window that says “Successful”
Click “OK” to close that window
NOTE: The Auto power Controller option will be grayed out
Click on the “Advance” button and the “Enter Password” window appears
Enter password: 26888
Now the “Auto Power Control” option at the bottom of the screen is no longer grayed out

Program the time you want your sign to turn on under: “Power on”
Program the time you want your sign to turn off under: “Power off”
Once you have made the changes click on the “Write” button
Note: if asked for a password type: 16888
Answer: Signs with radio frequency (RF) modem communication:
Double click on the LedTool folder

Double click on the icon that has the hammer called “LedTool”
When the LedTool window appears select the “AntiView2000” option and click “OK”
Make sure that you have the gold (or silver or black) RF modem connected to your computer and know what COM port # you are using for the modem connection
Click on the top left hand corner on the option that says “Communication” when you put your mouse curser over it.
When the “Communication” window appears select the following options:
- “Board is on RS485 network”
- “Port” Com # depends on your computer (see above)
- “Baud rate” is 9600
- “ID” is 1
Click “OK”
Click “Read” on the top right hand corner
You should get a window that says “Successful”
Click “OK” to close that window
NOTE: The Auto Power Controller option will be grayed out
Click on the “Advance” button and the “Enter Password” window appears
Enter this password: 26888
Now the “Auto power control” option at the bottom of the screen is no longer grayed out
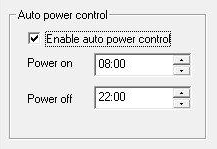
Program the time you want your sign to turn on under: “Power on”
Program the time you want your sign to turn off under: “Power off”
Once you have made the changes click on the “Write” button
Note: if asked for a password type: 16888
If you have a TWO SIDED EMC Sign:
To schedule your power on / power off times for the second sign:
Click on the top left hand corner on the option that says “Communication” when you put your mouse curser over it.
The “Communication” window appears
Select the following options:
- “Board is on RS485 network”
- “Port” COM # depends on your computer settings
- “Baud rate” is 9600
- “ID” is 2
Click “OK”
Click “Read” on the top right hand corner
You should get a window that says “Successful”
Click “OK” to close that window
NOTE: The “Auto power controller” option will be grayed out
Click on the “Advance” button and the “Enter Password” window appears
Enter the password: 26888
Now the “Auto power control” option the bottom of the screen is no longer grayed out

Program the time you want your sign to turn on under: “Power on”
Program the time you want your sign to turn off under: “Power off”
Once you have made the changes click on the “Write” button
Note: if asked for a password type: 16888
