Radio Frequency (RF) Modem Communication
(Tri-Color and Monochrome EMC Signs purchased prior to July 2010)
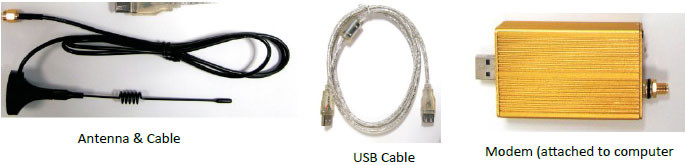
This is most likely the type of communication you have if you purchased your EMC prior to July of 2010. The components for communicating with the sign will look like:
Problem: I can’t communicate with my sign (the messages aren’t being sent to my sign)
Potential Cause: The sign has no power or isn't powered on
Troubleshooting steps:
- Check to see if the sign is powered on
- Reset your electrical breaker
- Have your electrician check the AC Voltage to the sign
- Have your electrician check the DC Output and the AC input to the sign’s power supplies inside the sign
Potential Cause: The computer isn't in line of sign with the sign
Troubleshooting steps:
- Is there a clear view between your computer and the sign? Make sure the sign can see your computer, that there are no trees, or other obstructions between them.
- Get closer to the sign to obtain a stronger signal
Potential Cause: The computer is too far away from the sign
Troubleshooting steps:
- The radio frequency (RF) modem that communicates with your sign has a limited range. Make sure you’re within 10 to 30 feet of the sign when sending the message.
- If you are standing 20 to 30 feet away from the sign and it still doesn’t communicate, try moving close to the sign—around 10 feet.
Potential Cause: It's a Sign Setup issue
The SignX software may not have been setup properly initially or it may have gone back to default settings. In these cases the best course of action is to go through the Sign Setup process again. These are the steps to set up the sign to communicate with SignX once again.
Troubleshooting steps:
- Within the SignX software go to “File” and then select ” Sign Setup”
- Select the current sign under the “Signs” section and then click on “Delete Sign” button to delete the incorrect sign name on the left hand side of the “Sign Setup” window.

Click on “New Sign” button
The “Sign Setting” window appears and for “Sign Name” it should read “sign1” , “ID1”

“Sign Type” varies on the type of sign that you have. The “Sign Type” indicates the matrix of the sign or the number of pixels high by the number of pixels wide on your sign. An example of a
Sign Type would be 32×144 or 56×144. If you can’t find your sign matrix on your original documentation then please contact us to get it.
“Communication” should be set to “RS232/RS485”
To find the “Port” (COM #) you will need to look for it manually. If you have Windows XP, Vista or Windows 7:
- *Make sure that the RF modem (a gold, silver or black box) is plugged into the computer/laptop*
- Click on “Start” on the bottom left hand corner of your laptop/computer
- Right click on “(My)Computer” in the drop down menu click on “Manage”
- The “Computer Management” window opens and click on “Device Manager” on the left hand side
- On the right hand side of the “Computer Management” window double click on “Ports (COM & LPT)” (When you double click on “Ports (com & LPT)” you will notice a minus (-)symbol to the left of “Ports (COM & LPT))
- Under ports you should see Prolific USB to serial adaptor Com and a number
- Remember the “COM #” because you will need to make sure that the SX software has the same COM port # that you found on your “Device Manager” window.

Go back to the “Sign Setting” window in the SX software
Now you can change the “Port” (COM #) to the COM # that you found in your “Device Manager” window
All outdoor signs should have a “Baud rate” of 9600
Click “OK”
Make sure that the sign name on the left hand side of the “Sign Setup” window is highlighted in blue and then click “Go to Selected Sign” button

Potential Cause: It's a COM Port Issue
Sometimes COM Port issues arise if you plug your modem into one COM Port (aka USB port) initially, then unplug it and plug it back into a different COM port. If it is a COM port issue you will need to find the right COM port # where the modem is plugged in and input it into your SignX software.
Troubleshooting steps:
- To find the “Port” (COM #) you will need to look for it manually. If you have Windows XP, Vista or Windows 7:
- * Make sure that the RF modem (a gold, silver or black box) is plugged in to the computer/laptop *
- Click on “Start” on the bottom left hand corner of your laptop/computer
- Right click on “(My)Computer” in the drop down menu click on “Manage”
- The “Computer Management” window opens and click on “Device Manager” on the left hand side
- On the right hand side of the “Computer Management” window double click on “Ports (COM & LPT)”
- (When you double click on “Ports (com & LPT)” you will notice a minus (-)symbol to the left of “Ports (COM & LPT)” )
- Under ports you should see Prolific USB to serial adapter COM and a number
- Remember the “COM #” because you will need to make sure that the SX software has the same COM port # that you found on your “Device Manager” window.
Go back to the “Sign Setting” window on the SX software
Now you can change the “Port” (COM #) to the COM # that you found in your “Device Manager” window
Potential Cause: It's a Controller Issue
A controller issue can arise if the wrong controller was selected during the Sign Setup process or if the controller goes back to the default settings.
Troubleshooting steps:
- Open the SignX media software
- Go to “File” in the top menu bar then select the “Sign Setup” option
- When the “Sign Setup” window opens, click on “New Type”
- In the “New Sign Type” window that appears look for the “Controller” drop down option

Under the Controller drop down selection select “Antiview2000”
Make sure the “Sign Width” number and the “Sign Height” number correspond to the matrix of your sign. This is usually depicted as “32 x 144” or some configuration as such. Your matrix should either be on your original paperwork or on a sticker on your Netbook if you purchased your sign more recently.
Make sure the “Sign Color” is set to “RG Color” if you have a tri-color sign and “Mono Color” if you have a yellow monochrome sign
Click “OK”
Now go to “File” and then select ” Sign Setup”
Select the current sign under the “Signs” section and then click on “Delete Sign” button to delete the incorrect sign name on the left hand side of the “Sign Setup” window.

Click on “New Sign” button
The “Sign Setting” window appears and for “Sign Name” it should read “sign1” , “ID1”
The “Sign Type” depends on the model sign that you have. The “Sign Type” indicates the matrix of the sign (the number of pixels high by the number of pixels wide on your sign) and the color output of your sign (monochrome, tri-color or full color). An example of a Sign Type would be 32×144 or 56×144 for the matrix and mono, RG or full for the color choices. If you can’t find your sign matrix on your original documentation then please contact us to get it.
“Communication” should be set to “RS232/RS485”
To find the “Port” (COM #) you will need to look for it manually. If you have Windows XP or Windows7:
- *Make sure that the RF modem (a gold, silver or black box) is plugged into the computer/laptop*
- Click on “Start” on the bottom left hand corner of your laptop/computer
- Right click on “(My)Computer” in the drop down menu click on “Manage”
- The “Computer Management” window opens and click on “Device Manager” on the left hand side
On the right hand side of the “Computer Management” window double click on “Ports (COM & LPT)”
(When you double click on “Ports (com & LPT)” you will notice a minus (-)symbol to the left of “Ports (COM & LPT))
Under ports you should see Prolific USB to serial adaptor Com and a number
Remember the COM # because you will need to make sure that the SignX software has the same COM port # that you found on your “Device Manager” window.
Go back to the “Sign Setting” window in the SignX software
Now you can change the “Port” (COM #) to the COM # that you found in your “Device Manager” window
The “Baud rate” should be “9600”
Click “OK”
Make sure that the Sign Name on the left hand side of the “Sign Setup” window is highlighted in blue and then click “Go to Selected Sign” button

Potential Cause: There could be EMI (Electro Magnetic Interference)
You could have EMI or Electromagnetic Interference in your immediate vicinity. This can easily stop the wireless signals from reaching your sign or scrambling them altogether
Troubleshooting steps:
- Try to get as close as you can to the sign when sending a message
Problem: I have a “Failed to open COM” or “Failed to get version information” error message
Potential Cause: Software Setup Error
If you have SignX version 1.12 or earlier.
Troubleshooting steps for this:
- On the SignX software click on “File” and then select “Sign Setup”
- Click the “Delete Sign” button to delete the incorrect sign name on the left hand side of the “Sign Setup” window
- Click on the “New Sign” button
- The “Sign Setting” window appears and for “Sign Name” it should read “sign1” , “ID1”

The “Sign Type” varies and is dependent on the type of sign you own. You should know whether your sign color is tri-color (RG) or full color (RGB) and you should know the matrix of your sign – or the sign height by the sign width in pixels. Some popular matrix settings include “32 x 144” or “24 x 112” but you should check your documentation to make sure of the right matrix for your sign.
“Communication” should be set to “RS232/RS485”
To find the “Port” (COM #) you will need to look for it manually. If you have Windows XP, Vista or Windows 7 operating system:
Make sure that the RF modem (a gold, silver or black box) is plugged into your computer / laptop
Click on “Start” on the bottom left hand corner of your computer
Right click on “(My)Computer” in the drop down menu click on “Manage”

The “Computer Management” window opens and click on “Device Manager” on the left hand side
On the right hand side of the “Computer Management” window double click on “Ports (COM & LPT)
When you double click on “Ports (com & LPT)” you will notice a minus (-)symbol to the left of “Ports (COM & LPT)”
Under ports you should see Prolific USB to serial adaptor Com and a number
Remember the COM # because you will need to make sure that the SignX software has the same COM port # that you found on your “Device Manager” window
Go back to the “Sign Setting” window in the SignX software
Now you can change the “Port” (COM #) to the COM # that you found in your “Device Manager” window
The “Baud rate” should be 9600
Click “OK”
Make sure that the sign name on the left hand side of the “Sign setup” window is highlighted in blue and then click “Go to Selected Sign” button
Problem: Part of my sign doesn’t light up (either an entire section or pixels on the sign)
Potential Cause: Temporary electronic glitch
Sometimes a module may just go out because of a small glitch in the electronics but it doesn’t cause a permanent outage. A simple reboot of the sign fixes this issue in most instances.
Troubleshooting steps:
- Reboot the sign. This must be done at your electrical box by simply turning power off then back or to the sign circuit.
Potential Cause: Loose or bad ribbon cable
For this troubleshooting step you must have an electrician go inside your sign to check for the loose ribbon cables.
Troubleshooting steps:
- ** Make sure your sign is powered down before your electrician performs any work **
- Have a professional electrician perform these steps to ensure safety.
- Open your sign
- Unplug the ribbon cable from the module or part of the sign that isn’t lighting up
![]()
![]()
Plug the ribbon cable back in to the slot from which you just unplugged it
If the module still doesn’t light up then try unplugging that same ribbon cable and plug it into a different module. We are now trying to determine if it is a ribbon cable failure or a module failure.
If the 2nd module still lights up after connecting the potential problem ribbon into the socket, then it is a module issue.
If the 2nd module that WAS working now does not work, then it is most likely a ribbon cable issue.
Either case call Signtronix technical support at (800) 729-4853 ext. 402 to report the problem and replacement parts will be ordered.
Potential Cause: Bad Module
Troubleshooting steps:
- Have your electrician open your sign and put a power meter on back of the module that isn’t working properly and make sure it’s getting power (5V)
- If the module is getting power but the module still doesn’t light up, then swap out the module for a new one. Contact Signtronix for a replacement part.
Problem: The time on my computer is correct but the sign is not displaying the correct time
Potential Cause: It's a Sign Setup issue
Troubleshooting steps:
- Make sure your computer has the right time set
- If your computer has the right time… Open the SignX software:
- Click on “Run” in the top menu then select “Date, Time & Temperature”
The “Date, Time & Temperature” window pops up
It will display the correct time on the window but still click the up and down arrow buttons next to the time until you see the right time then click “Set to Sign”
Now check the sign. It should be displaying the correct time.